Coding Assignments
➤ Assignment 1: Sensor Data Collection with On-Board Feature Extraction
➤ Assignment 2: End-to-end Development of an Activity Detection app
➤ Assignment 3: Post-Training Quantization
➤Assignment 4: Custom Keyword Spotting (KWS)
Assignment 1: Sensor Data Collection with On-Board Feature Extraction
Background:
As you know, the Arduino Nano BLE Sense board includes a built-in LSM9DS1 IMU module, which features a 3D accelerometer, 3D gyroscope, and 3D magnetometer. These sensors measure linear acceleration, rotational velocity, and magnetic field to determine the device’s orientation. Continuous measurements from these sensors can be used for various applications, including human activity detection, in realtime. However, raw IMU sensor data is often noisy and highly sensitive to small changes. Therefore, it is necessary to extract meaningful features over a moving time window before implementing machine learning models for real-time activity detection.
Figure 1: IMU sensors of Arduino Nano
Source: image link
Assignment Objective:
In this assignment, you will develop an end-to-end sensor data collection application with on-board feature extraction for activity detection, collect samples for various activities, and gain an understanding of the challenges involved in real-world sensor data collection.
Assignment Steps:
This assignment involves completing the following three steps:
Step 1: Write a MicroPython Script to Collect IMU Sensor Data
Your script should:
- Continuously read and store data from all three channels of the accelerometer, gyroscope, and magnetometer into separate variables (e.g.,
Ax, Ay, Azfor the accelerometer;Gx, Gy, Gzfor the gyroscope; andMx, My, Mzfor the magnetometer). - Create a buffer (size
N=100) for each of the nine channels. Each buffer should retain only the most recent readings. - Write MicroPython functions to extract at least 10 different time-series features (e.g., mean, min, max, standard deviation) for each of the nine channels from their respective buffers. Note that MicroPython does not provide the necessary libraries for extracting the features using various mathematical or statistical functions. So, you may need to implement them in pure MicroPython from scratch.
- Print the data (sequence number, buffer size, raw IMU data, and extracted features) to the terminal using UART. Use proper formatting and naming conventions. For example:
Seq:0 N:100 Ax:0.03 Ay:-0.01 Az:0.99 Gx:0.12 Gy:0.73 Gz:-1.77 Mx:-12.74 My:52.00 Mz:1.11 Ax_mean:0.45 Ax_min:0.45 Ax_max:0.45 ... Gx_mean:0.12 Gx_min:0.73 Gx_max:-1.77 ... Mx_mean:-12.74 Mx_min:52.00 Mx_max:1.11
The sequence number should be unique and increment with each iteration.
Step 2: Write a Python Script for Data Collection
Develop a Python script that runs on your computer/laptop to:
- Read sensor data from the Nano 33 BLE Sense board via a serial interface (e.g., a COM port on Windows).
- Parse the data received from the board and store it in a
.CSV file.
A sample code will be provided, but you need to modify it to suit your data collection needs.
Optional:
Develop a simple real-time sensor data visualization application using Streamlit
Step 3: Collect IMU Sensor Data for Multiple Activities
Using the setup above, collect IMU sensor data and features for at least three different activities (e.g., walking, running, etc.).
- Collect a minimum of 5,000 samples for each activity.
- Save the data for each activity in separate
.CSVfiles.
Submission Format:
Your final submission should include:
- MicroPython Code: For reading IMU sensor data and performing on-board feature extraction
(4 marks). - Python Code: For reading sensor data from the Nano 33 BLE Sense board
(1 mark). - Activity Data: Separate
.CSVfiles for each activity, containing at least 5,000 samples per activity(3 marks). -
Write-Up: A text file with a brief summary of lessons learned, such as
(2 marks):- How many samples were you able to collect per second?
- What changes would you make to your code to increase the sampling rate?
- What challenges did you encounter while collecting real-world data using IMU sensors?
- Any other insights or observations?
Submission deadline:
This assignment is due on Thursday, February 6, at 11:59 PM. Late submissions will be accepted until Saturday, February 8, at 11:59 PM. Please note that these deadlines are firm, and no extensions will be granted!
References:
- 9-Axis IMU - Youtube-link
- Activity Recognition Experiment Using Smartphone Sensors - website-link
- Awesome-IMU-Sensing - github-link
- Awesome Human Activity Recognition - github-link
- A Survey on Deep Learning for Human Activity Recognition - website-link
- tsfresh features - website-link
- tsfresh feature calculator code - github-link
- MicroPython math library - website-link
- MicroPython statistics library - github-link
- pySerial library - website-link
Assignment 2: End-to-end Development of an Activity Detection app
Background:
Smartwatches and fitness trackers have revolutionized the healthcare and fitness industry by enabling real-time monitoring of physical activities such as walking, jogging, and cycling. Have you ever wondered how these devices detect different activities in real time? They use built-in motion sensors, such as accelerometers and gyroscopes, to collect raw movement data, which is then processed by machine learning models running on the device to classify various activities in real time.
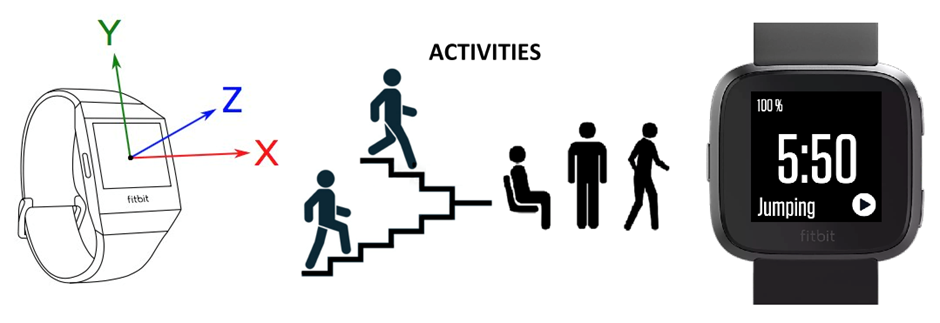
Figure 2: Flowchart of activity detection
Source: image link
Objective:
In this assignment, you are required to implement an end-to-end activity detection system using the Arduino Nano BLE Sense board, which includes an onboard IMU sensor. You are required to collect sensor data for various common activities, implement an ML workflow for model development, including feature extraction, ML model training, hyperparameter tuning, and cross-validation, and finally deploy the ML model on the Arduino Nano BLE Sense and demonstrate the activity detection application.
Assignment Steps:
This assignment involves completing the following four steps:
Step 1: Data Collection (2 marks)
-
Collect 5,000 samples of continuous IMU sensor data (accelerometer, gyroscope, magnetometer) for at least five different activities. Activities can include idle, walking, running, jumping, stretching, writing, typing, etc.
-
Store the collected data in, appropriately named
.csvfiles. e.g.walking.csv -
You may use the code from previous assignments or lab sessions.
Step 2: Activity Detection Model Development (4 marks)
- Create a Colab notebook to implement an ML workflow, including data preprocessing, exploratory analysis, feature engineering, model training, hyperparameter tuning, and cross-validation.
- Exploratory Data Analysis (EDA): Visualize and analyze sensor patterns across activities to identify the patterns.
- Feature Engineering: Extract at least 10 features, which can be either historical or statistical (using a sliding window approach similar to the first coding assignment)
- Model Selection: Train at least three ML models, such as
Decision Tree, Random Forest, or XGBRFClassifier that are supported by them2cgenlibrary. - Model Optimization: Apply hyperparameter tuning and cross-validation techniques.
- Final Model Selection: Choose the best-performing model based on classification accuracy. The selected model must achieve at least 90% accuracy.
Step 3: Model Deployment (2 marks)
- Convert the trained model into Python code using the m2cgen tool.
- Write a MicroPython script to deploy the selected model on the Arduino Nano BLE Sense board.
- Implement real-time inference by integrating feature extraction based on the selected features from model development.
- The detected activity should be continuously printed on the terminal.
Step 4: Demonstration (2 marks)
- Demonstrate the working of your activity detection application.
- Ensure that your application is robust and accurately classifies activities. If required, repeat the above steps.
Submission instructions:
You are required to submit the following files:
- Sensor Data Files: Separate files for each activity, containing 5,000 samples each. Append your full name as a suffix to the filename (e.g.,
walking_anil_kumar.csv). - A Colab notebook (e.g.,
activity_detection.ipynb) implementing the ML workflow for model development. - A MicroPython file (e.g.,
predict.py) for model deployment and real-time inference. Note that this file should contain the logic for feature extraction.
Note that you are required to demonstrate your application during the next lab session or to the TAs before the final submission of this assignment. Failing to do so will result in zero mark, even if you have completed the other steps.
References:
m2cgen - github-link
Assignment 3: Post-Training Quantization
Instructions
In this assignment, you are required to analyze the efficiency metrics of computer vision models before and after applying post-training quantization techniques using TensorFlow.
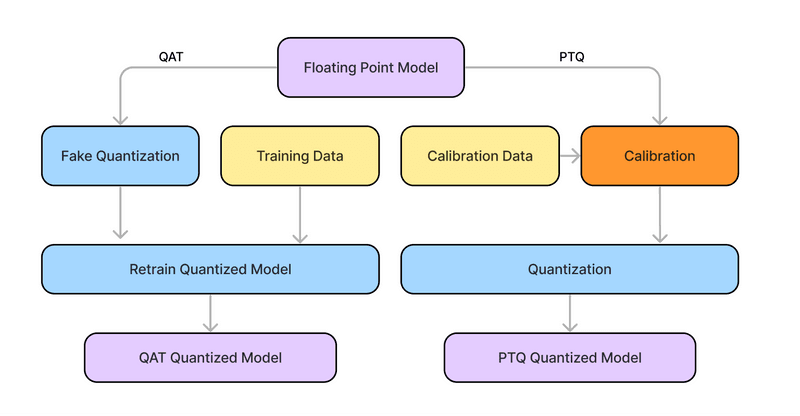
Figure 3: Comparison between quantization-aware training and post-training quantization
Source: image link
Objective:
The objective of this assignment is to implement and understand different post-training quantization techniques and analyze the model’s performance and efficiencies before and after quantization.
Specific Tasks:
- Implement MobileNetV2 models for image classification using the Rock-Paper-Scissors dataset (or any other dataset). You can train the network from scratch or fine-tune the MobileNetV2 model (using ImageNet weights) by training only the top 10 layers along with custom classifier layers corresponding to the number of classes in the given dataset. You may follow standard deep learning model development practices such as image augmentation, train/validation/test set split ratios, number of epochs, optimizers, evaluation metrics, etc. Make sure the test accuracy is at least 75%.
(2 marks) - Extract and analyze the compute and memory-related efficiency metrics of the trained model, both layer-wise and for the whole model, and measure the accuracy on the test dataset.
(2 marks) - Apply post-training integer quantization
(int8)and compare the model’s compute and memory-related metrics and accuracy with the original float32 model. Summarize your observations, including improvements in model size and inference time, as well as accuracy trade-offs.(2 marks) - Implement n-bit clustering-based quantization to the original float32 model and calculate the compression ratio and quantization error after reconstructing it for the whole model and each layer. Summarize your observations.
(2 marks) - Implement linear quantization
(int8 and int16)to the original float32 model and calculate the compression ratio and quantization error after reconstructing it for the whole model and each layer. Summarize your observations.(2 marks)
Submission format:
Submit your code and analysis as a single Google Colab notebook (.ipynb) file.
References:
- Rock Paper Scissors using MobileNetV2 - You can reuse this notebook for completing the first step. Modify the code as per your requirements.
- LiteRT - Post-training integer quantization
- Linear Quantization - Post Training Quantization
- Machine Learning Experiments - This repository contains the implementation of various CNN models for image classification and objection. One can use the MobileNetV2 model for object detection, instead of classification.
Assignment 4: Custom Keyword Spotting (KWS)
Background
Keyword spotting (KWS) is a speech recognition task, where the goal is to detect specific keywords from an audio stream. This technology is widely used in voice-activated systems like smart assistants (e.g., Google Assistant, Amazon Alexa). In this assignment, you will develop an end-to-end keyword-spotting application that can recognize your name.
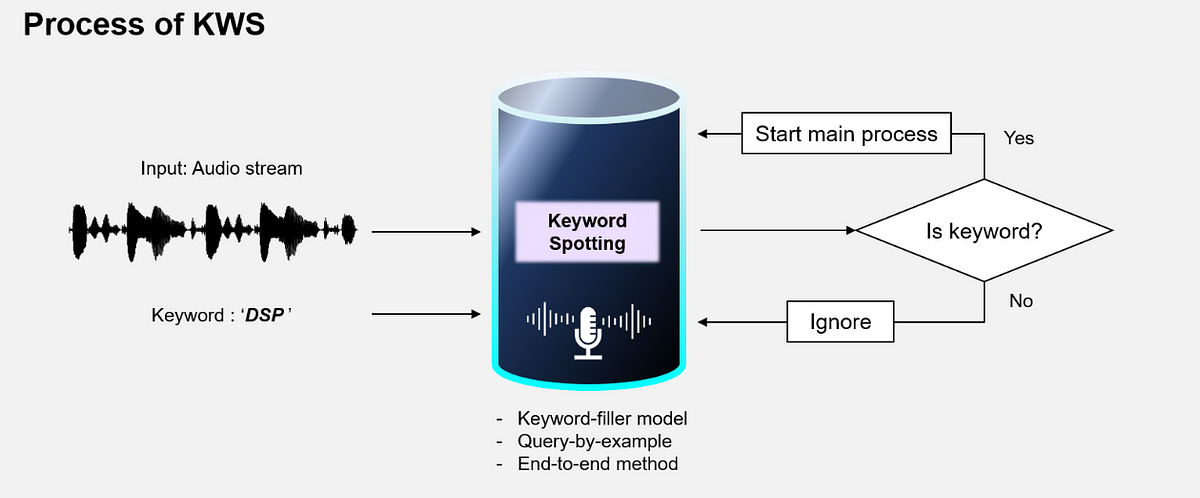
Figure 4: Keyword Spotting
Source: image link
Assignment Steps
The assignment involves completing the following three steps:
Step 1: Data Collection (4 marks)
- Record at least 200 samples of your name spoken clearly
(e.g., “Deepak”)in various environments, with different background noises, at varying volumes, and speeds. If your name is longer, use a short name. - Store the audio recordings as .wav files. The duration of each file should be 1 second. Ensure that the audio files are of good quality and properly labeled.
- Refer the speech_commands dataset for more details - Tensorflow
Step 2: Model Development and Compression (4 marks)
Process the collected audio data, train a model to classify the keyword (your name), and optimize the model for deployment.
Step 3: Model Deployment and Demonstration (3 marks)
Deploy the compressed model into Nano 33 BLE Sense by updating the default KWS app and then demonstrate the working of your application.
Submission
All datasets, Jupyter Notebook for model development and compression, modified KWS app.
Note: This is a lab-based assignment. You can complete the software setup, data collection, and model development before the lab session. The final demo should be shown during the lab session.
References:
- Training Your Custom Dataset Keyword Spotting Model - Colab Notebook
- KWS on Nicla Vision - Tutorial